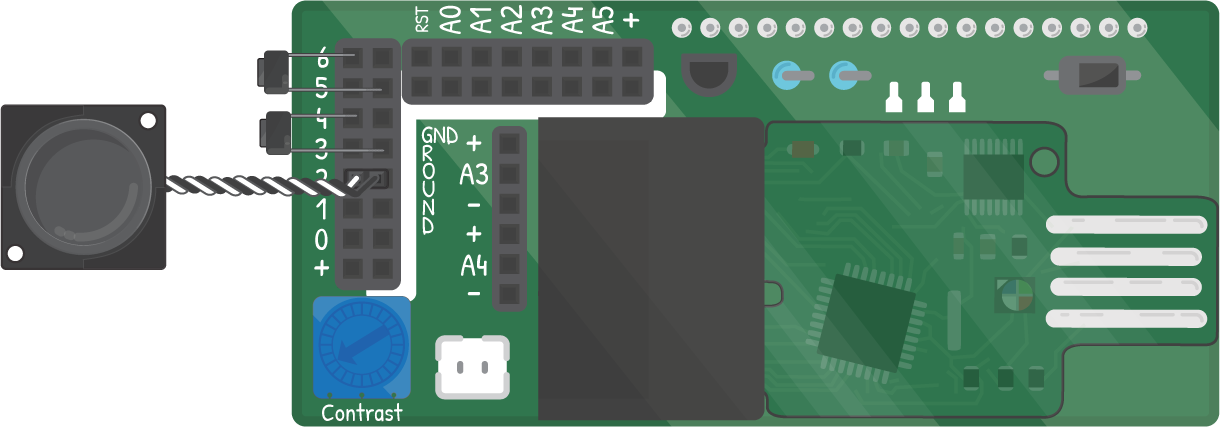
Lesson Five: Time-Setting Buttons

One of the best things about 'physical computing' like you're doing is that code can interact with the real world. This program illustrates that by adding two buttons so that you (or anyone else) can change the time without digging into the code.
/*
* In the last project, you added a speaker for a noisy alarm.
*
* Here, you'll be adding in buttons to adjust the time on the clock
* without uploading new code to it.
*
* You'll add two buttons- one to select which part of the
* time to change (hour, minute, second), and the other to change it.
* The buttons should be on pins 6 and 4.One leg goes in to the signal
* pin and the other goes into the GND row. Use your component cards to
* better understand how the buttons should hook up.
*/
#include "MakerScreenXVI.h"
MakerScreenXVI lcd;
int seconds = 50;
int minutes = 59;
int hours = 1;
bool AMPM = 1;
long timer;
long beepTimer;
int alarmMinute = 00;
int alarmHour = 2;
bool alarmAMPM = 1;
bool alarmState = 0;
/*
* This holds the record of which part of the time we are changing.
* 0 = hours, 1 = minutes, 2 = AMPM. Ignore seconds for now.
*/
int setTime = 0;//Which portion of time are you setting? 0=H, 1=M, 2=AMPM
void setup() {
lcd.begin();
lcd.backlightOn();
timer = millis();//set timer equal to the internal counter
pinMode(2,OUTPUT); //speaker on pin 2 and GND
/*
* Button pins are INPUT_PULLUPs. They send a signal (pressed or
* unpressed) to the Maker Board. Pressed is LOW, unpressed is HIGH.
*/
pinMode(6,INPUT_PULLUP); //Button to select which variable you're changing
pinMode(4,INPUT_PULLUP); //Button to change the variable's value
}
void loop() {
if (millis() - timer >= 1000){
seconds = seconds + 1;
timer = timer + 1000;
}
/*
* Check the buttons to see if they have been
* pressed. Check the button on pin 6, which will be the
* selection changing one. LOW means the button is pressed.
*/
if (digitalRead(6) == LOW){ //if button 6 is pressed...
/*
* A 'while' loop works a bit like an 'if' loop- it checks to see if
* the condition in parenthesis is true, and if it is, does the
* code in the following block. A while loop is different from
* 'if'because 'if' runs it's code block code once per loop, but 'while'
* checks its condition again after running. If the condition is still true,
* it will run again, creating a loop of itself until the condition is no
* longer true.
*/
while (digitalRead(6) == LOW){//wait for button release...
delay(10);
}
// Change the setTime variable, but keep it in the 0-2 range.
setTime = setTime + 1;
if (setTime == 3){ //a simple way to keep setTime from going past 2
setTime = 0;
}
}
/*
* Check the button on pin 4, which changes the selected time element
* if pressed.
*/
if (digitalRead(4) == LOW){
while (digitalRead(4) == LOW){
delay(10);
}
if (setTime == 0){ // setTime = 0 means 'hour' is selected
hours = hours + 1;
if (hours == 13){ // Keep the hours counter in the 1-12 range
hours = 1;
}
}
if (setTime == 1){ //setTime = 1 means 'minute' is selected
minutes = minutes + 1;
if (minutes == 60){ //roll over minutes to 0 when you reach 60
minutes = 0;
}
}
if (setTime == 2){ //setTime = 2 means 'AMPM' is selected
AMPM = 1 - AMPM; //swap from AM to PM or PM to AM
}
}
//Check for second rollover
if (seconds >= 60){
seconds = seconds - 60;
minutes = minutes + 1;
alarmState = 0;
// Start the beep timer here
beepTimer = millis();
}
//Check for minute rollover
if (minutes >= 60){
minutes = minutes - 60;
hours = hours + 1;
if (hours == 12){
AMPM = 1 - AMPM;
}
if (hours == 13){
hours = 1;
}
}
//set the alarm state with this 'if'
if ((hours == alarmHour)&&(minutes == alarmMinute)&&(AMPM == alarmAMPM)){
alarmState = 1;
}
//Print all of the time to the display if the alarm isn't on
if (alarmState == 0){
lcd.clear();
lcd.print(hours);
lcd.print(":");
if (minutes < 10){
lcd.print("0");
}
lcd.print(minutes);
lcd.print(":");
if (seconds < 10){
lcd.print("0");
}
lcd.print(seconds);
if (AMPM == 0){
lcd.print(" AM");
}
if (AMPM == 1){
lcd.print(" PM");
}
/*
* You also want to indicate which of the values is the one
* currently selected to change, so after the time, you are
* going to display an indicator: HH, MM, AP for which is the
* selection
*/
if (setTime == 0){
lcd.print(" HH");
}
if (setTime == 1){
lcd.print(" MM");
}
if (setTime == 2){
lcd.print(" AP");
}
noTone(2);
}
else{
lcd.clear();
lcd.print("Wake Up!");
if (millis()-beepTimer < 500){
tone(2,330);
}
else if (millis()-beepTimer < 1000){
noTone(2);
}
else{
beepTimer = millis();
}
}
delay(150);
}
/*
* Now you have a working clock with real-world inputs that allow you to
* interact with the code on Maker Board.
*
* Try to make the changes needed to set the 'second' time with your
* buttons. You need to allow setTime to have a value of 3 and create
* 'if' statements like those around line 100. Look for the pattern you
* can copy.
*
* In the next lesson, you'll add a third button to set your alarm time
* outside the code, too.
*/
// (c) 2017 Let's Start Coding. License: www.letsstartcoding.com/bsdlicense
Heads up! You need our Chrome App to run this code.
Success!
Compile errors:
Serial port monitor:
Input:
After this lesson, someone besides the developer (you) should be able to interact with your creation and make it work! Now your code is working in the real world like an alarm clock.

