Lesson Six: Alarm-Setting Button
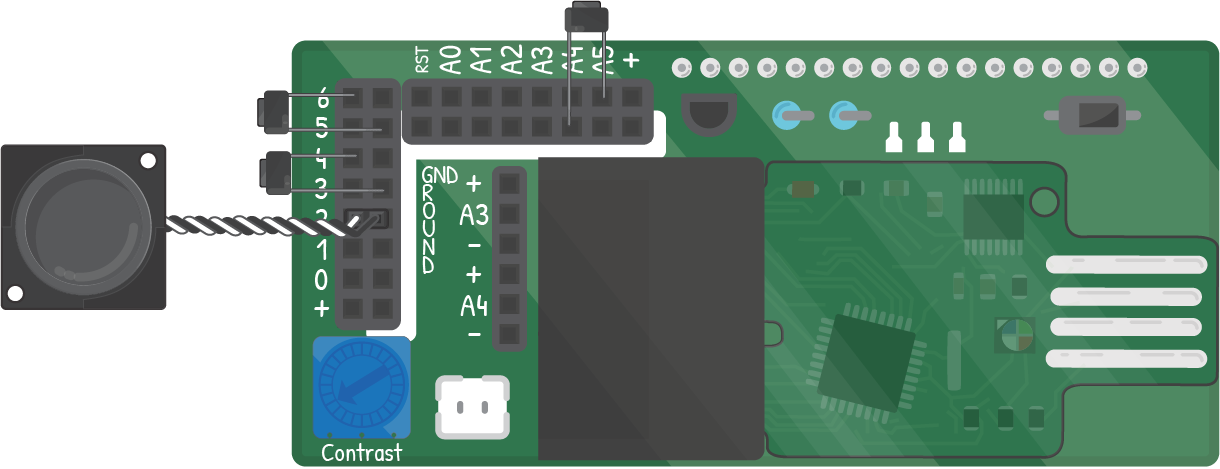
 
Lets-Start-Coding-Alarm-Clock-with-all-buttons
 

In this lesson, you'll add a seemingly simple feature that requires a significant amount of code to implement. Use this lesson to hone your logic skills and think about how the different 'branches' this program could now take. 

Topics Covered:

/* * In this final lesson, you'll add a third button to set the alarm time * in addition to the clock time. The new button will switch the program * between two modes- alarm setting and time setting. * * In the time mode, operation will be the same as in the previous * program, but in the alarm mode, the alarm time will be displayed * and the buttons on 6 and 4 will set it. * * The new button will be on pin A5. */ #include "MakerScreenXVI.h" MakerScreenXVI lcd; //setting the initial time int seconds = 50; int minutes = 59; int hours = 1; bool AMPM = 1; long timer; long beepTimer; //setting the initial alarm int alarmMinute = 00; int alarmHour = 2; bool alarmAMPM = 1; bool alarmState = 0; int setTime = 0;//Which portion of time are you setting? 0=H, 1=M, 2=AMPM // Variable to control whether you're in the alarm setting mode // or the time setting mode. 0 is for time, 1 is for alarm. bool setMode = 0; //0 is time mode, 1 is alarm mode void setup() { lcd.begin(); lcd.backlightOn(); timer = millis();//set the timer variable equal to the internal counter pinMode(2,OUTPUT); //speaker on pin 2 and GND pinMode(6,INPUT_PULLUP); //Button to select which variable you're changing pinMode(4,INPUT_PULLUP); //Button to change the variable's value pinMode(A5,INPUT_PULLUP);//Button to toggle between alarm and time modes } void loop() { if (millis() - timer >= 1000){ seconds = seconds + 1; timer = timer + 1000; } //If the mode button is pressed.... if (digitalRead(A5) == LOW){ while (digitalRead(A5) == LOW){ //Wait for button to release delay(10); } //Switch between 0 and 1 just like you do with AMPM setMode = 1 - setMode; /* * Turn the alarm off when mode button ispressed so that changing * the mode cancels the old alarm */ alarmState = 0; } /* * The button on pin 6 acts the same regardless of the mode the clock * is in. */ if (digitalRead(6) == LOW){ //if the 'variable selector button' is pressed... while (digitalRead(6) == LOW){ //wait for button release... delay(10); } setTime = setTime + 1; //update setTime to H, M, or AMPM. if (setTime == 3){ setTime = 0; } } if (digitalRead(4) == LOW){ //if the 'variable changer button' is pressed... while (digitalRead(4) == LOW){ delay(10); } /* * There are now 6 potential variables you are changing: hour, minute, * and AM/PM for alarm and hour, minute, and AM/PM for time. * * The 'if' statements follow a pattern that you should try to follow: * 1) Check which variable (hour, minute, AMPM) * 2) Check which mode (time or alarm) * 3) Check for a rollover (second to minute, minute to hour) * * Step 3 doesn't happen for AMPM, but you should see that there are * 3 'sets' of 'if' statements below that follow the same pattern. Pay * close attention to the way that braces contain some 'if' statements * inside each other. */ // For each of these where you change the time, now check // which mode you're in and change variables based on that mode if (setTime == 0){ //setTime = 0 is 'hour' if (setMode == 0){ //setMode == 0 is 'time mode' hours = hours + 1; if (hours == 13){ hours = 1; } } else if (setMode == 1){ //setMode == 1 is 'alarm mode' alarmHour = alarmHour + 1; if (alarmHour == 13){ alarmHour = 1; } } } //if it's the minutes that you're updating... if (setTime == 1){ if (setMode == 0){ //and you're in time mode.. minutes = minutes + 1; //add to minutes and check for rollover if (minutes == 60){ minutes = 0; } } else if (setMode == 1){ // alarmMinute = alarmMinute + 1; if (alarmMinute == 60){ alarmMinute = 0; } } } if (setTime == 2){ if (setMode == 0){ AMPM = 1 - AMPM; } else if (setMode == 1){ alarmAMPM = 1 - alarmAMPM; } } } if (seconds >= 60){ seconds = seconds - 60; minutes = minutes + 1; alarmState = 0; beepTimer = millis(); } if (minutes >= 60){ minutes = minutes - 60; hours = hours + 1; if (hours == 12){ AMPM = 1 - AMPM; } if (hours == 13){ hours = 1; } } if ((hours == alarmHour)&&(minutes == alarmMinute)&&(AMPM == alarmAMPM)){ alarmState = 1; } if (alarmState == 0){//if the alarm is off, check which mode you're in /* * Make the display reflect which mode you are in. Add in a similar * pair of checks here to display either the current time or the * alarm time, depending on the mode. */ if (setMode == 0){ //setMode = 0 is 'time mode' lcd.clear(); lcd.print(hours); lcd.print(":"); if (minutes < 10){ lcd.print("0"); } lcd.print(minutes); lcd.print(":"); if (seconds < 10){ lcd.print("0"); } lcd.print(seconds); if (AMPM == 0){ lcd.print(" AM"); } if (AMPM == 1){ lcd.print(" PM"); } } if (setMode == 1){//setMode == 1 is alarm mode lcd.clear(); lcd.print(alarmHour); lcd.print(":"); if (alarmMinute < 10){ //Add the leading 0 for these minutes lcd.print("0"); } lcd.print(alarmMinute); if (alarmAMPM == 0){ lcd.print(" AM"); } if (alarmAMPM == 1){ lcd.print(" PM"); } } /* * setTime functions do the same thing whether in alarm mode or in * time mode. Their checks are outside of the setMode checks. */ if (setTime == 0){ lcd.print(" HH"); } if (setTime == 1){ lcd.print(" MM"); } if (setTime == 2){ lcd.print(" AP"); } noTone(2); } else{ //This is the 'else' condition for the alarmMode == 0. lcd.clear(); lcd.print("Wake Up!"); if (millis()-beepTimer < 500){ tone(2,330); } else if (millis()-beepTimer < 1000){ noTone(2); } else{ beepTimer = millis(); } } delay(150); } /* * This final project was about working in an extra set of * conditions to let you swap between setting the alarm and setting * the time. With this last addition, you have completed the alarm * clock! You can now set time and alarm directly from the hardware; * it's ready to go up as a fully functional clock! * * From here, you might add features like a snooze button, which turns * off an alarm and adds 5 minutes to the alarm time. You could * accomplish this with additional checks in the part of the 'mode select' * button which clears the old alarm. * * If you add that snooze, remember to check if adding in 5 minutes * works correctly- you want to be sure you get the correct new alarm * time! * * You might add in a different time delay for the alarm beeping so that * it goes off for 30 seconds instead of a full minute,or even until it * is reset by a button press! * * Other ideas: * - light displays along with the alarm, * - a backlight that automatically turns on and off at set times * - messages that change every hour and print below the time * - a combination of the clock with other * components from Let's Start Coding! * * That's the exciting thing about coding: the sky is the * limit, you can make whatever you think up! */ // (c) 2017 Let's Start Coding. License: www.letsstartcoding.com/bsdlicense
 

Now that you've built and experimented with the alarm clock, we hope you have some understanding and familiarity with all of the topics we covered.

The indentation and styling of lines 110-175 is critical to understanding how everything flows together. Looking back on the code now, you can see why it's so important to build good style habits. Without these, even the best code is nearly impossible to share with someone else who may improve it even further. 

Good luck with the modifications you'll make to your alarm clock!