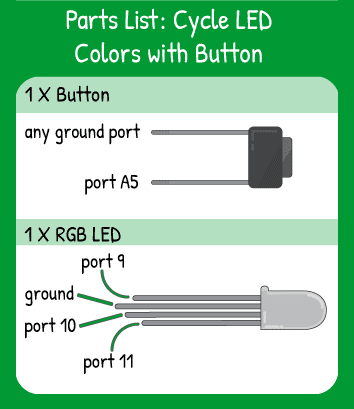
Cycle LED Colors with Button
Step 1 - Build the Project
Topics Covered:
For your code to use a single input to affect multiple outputs, you need to use a variable between them to ‘hold’ the value. In this code, the button press affects the variable pressCount, then the pressCount affects the state of the LED light.
Step 2 - Upload the Code
Step 3 - Read the Walkthrough
The pressCount variable starts at 0 and the loop doesn’t do anything until pressCount = 1, since all of the ‘if’ statements are false. The code is still running through the loop hundreds of times per minute, but there just isn’t anything for it to do.
As soon as digitalRead(A5)=LOW triggers the pressCount variable to increase by one, the outputs begin. Now the first ‘if’ statement is true: pressCount = 1. The effect is that the code between the { and } runs, turning pin 10 LOW and pin 11 HIGH.
Why do we ensure that pin 10 is turned LOW? When the code loops back through from pressCount = 3 to pressCount =1, pin 10 will be HIGH, since that’s what happens when pressCount = 3. If you don’t ensure that 10 is LOW, you’ll end up with a mixed color when pressCount = 1.
Once the ‘if’ statement pressCount = 1 is true, the code inside the braces {} will continue to run as the loop checks all of the ‘if’ statements continuously. As soon as digitalRead(A5)==LOW again, the pressCount moves up one and the next ‘if’ statement becomes true.
You can see in the ‘if digitalRead(A5) ==LOW” statement that there is a delay of 250 milliseconds. This keeps the code from running too quickly and increasing pressCount by 2,3, or more each time you press the button. Holding the button for more than 250 milliseconds, though, will increase the pressCount variable by more than one. Play with that delay and see how it changes the strobing effect between the colors.


