Sound Samples
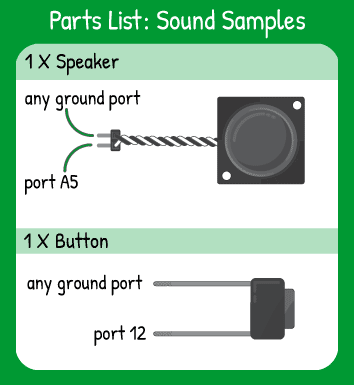
Step 1 - Build the Project
This code is a demonstration of how you can combine code concepts, hardware, and built-in functions to make something unique out of a speaker and a button.
Step 2 - Upload the Code
Step 3 - Read the Walkthrough
Since the input and output are not directly connected, you create a variable to hold the value from the button presses. The button press affects the variable, then the variable affects the tone.
There is also a function created for this sketch. A function is a cluster of code that always executes together. It’s really useful when you want to do a certain cluster of things over and over again. Instead of typing everything out, you create a function and call it by typing its name. In this case, checkPress() runs everything between the next { and its pair.
Each ‘if’ statement in the loop is paired with a separate sound or effect. The pressCount helps cycle through them.
For pressCount == 1, you’re ranging through the tones 0 to 1200 with a delay of 5 milliseconds between. The variable ‘i’ is only used for both counting up through the ‘for’ loop and for assigning the tone to the speaker. The ‘for’ will loop 1200 times, taking about 6000 milliseconds total, and will play each tone from 0 to 1200 for 5 milliseconds.
You can see that the checkPress() function is run every time the ‘for’ loop runs. Then an if statement inside the 'for' loop checks to see if pressCount does not equal 1 anymore. When that is true, the 'break' command ends the 'for' loop immediately and the code goes back to checking the if statements for pressCount.
pressCount == 2 is picking a random tone every 50 milliseconds and playing it to the speaker. You don’t need to use a variable here, since random() is a built-in Arduino function. Because there isn’t a ‘for’ loop here, any time you press the button, the pressCount will be incremented before the next random tone is played, so you don’t need to constantly check the function.
pressCount == 3 is another ‘for’ loop, this one moving in the opposite direction from pressCount ==1 . Starting at a tone value of 1300, the tone will fall by 1 every 5 milliseconds, then run the checkPress() function. When the value of i is 30, or when the value of pressCount is no longer 3, the ‘for’ loop will exit and check the ‘if’ statement again.
pressCount == 4 requires some variables to work correctly, so you create those variables right above the ‘while’ statement. While pressCount == 4, the variable ‘pitch’ is going to increase by ‘scale’ amount each time the loop is run. The ‘if’ statement inside the ‘while’ loop checks to see if the tone has reached a maximum of 1200 or a minimum of 0. If that’s true, then the scale becomes negative, reversing the tone’s direction.
pressCount == 5 plays two alternating tones back-to-back. One is rising and the other is falling by the amount in the variable ‘scale’. It uses variables to track these two tones and you can create them right above the ‘while’ loop. You want to play lowTone, play highTone, then increase lowTone by 10 and decrease highTone by 10. Within the ‘while’ is an ‘if’ statement that checks the value of lowTone and highTone every loop. When the max or minimum is hit, the lowTone and highTone are reset. It will only occur once each time that the variables are reset, but lowTone and highTone will be exactly equal at some point!
pressCount can continue on forever, but it stops here after 5. To reset the count to 0 and stop the tone, you can use a simple ‘if’ statement. Always be sure to check for all numbers greater than 5. Why? Imagine pressCount = 5 and you press and hold the button longer than you should. pressCount may now equal 7! Since you haven’t planned for 7 to be a possible pressCount, your code won’t know what to do.


