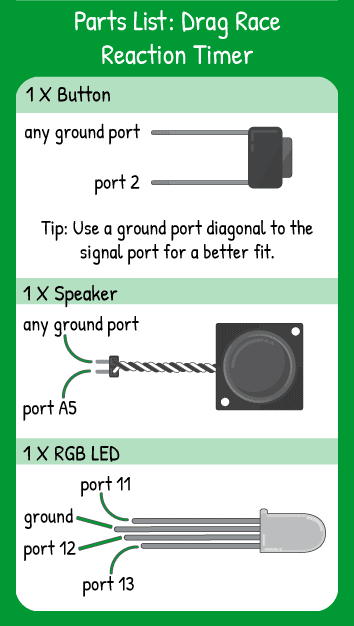
Drag Race Reaction Timer
Step 1 - Build the Project
To make a great reaction time game, you have to create very specific time windows where you’ll allow inputs to be read. For example, you don’t want to be able to hold down the button and get a perfect time for every run.
Note: If you're uploading this project directly from the website, first click Upload to Maker Board, complete the upload, then click "Monitor" to open up the serial monitor. This allows the data to be sent from the Maker Board to the Serial Monitor.
Step 2 - Upload the Code
Step 3 - Read the Walkthrough
The two variables at the beginning of this code are used to open and close the specific ‘timing windows’ you’ll need for the timing. In the setup() of the code, the LEDs and speaker need to be set as OUTPUTs and the button set as INPUT_PULLUP(). setup() is also where you start the serial monitor. The serial monitor is your window to the program on the Maker Board, so it can ‘print’ data or words. Once the code is uploaded, press the magnifying glass in the upper right corner of the Arduino programming window to open the serial monitor. Ensure that the number in the bottom right of the serial window is also 9600 or the information will be garbled.
The loop checks the status of the button and the status of the variables and acts when they change. In the first ‘if’ loop, the startCountdown variable is false, but the ‘if’ loop won’t start until the digitalRead of A5 is also LOW. When both of those things are true, the ‘ready’, ‘set’, ‘go!’ lights, sounds, and serial print outs happen.
Next, the code checks to see if the button on A5 has been released (i.e. it is reading HIGH), and if it is, the timeToGo variable becomes true, which ‘opens the time window’ for you to get your reaction time. If the A5 button isn’t released, then you’ve either held the button or pressed it before the third tone, so the code will print the “Too early!” message and restart the loop at the top.
If you pressed the button to start the countdown, then released it, the timeToGo variable will be set to true, so the code will fall down to the ‘while’ loop. While the timeToGo variable is true, the ‘timer’ variable starts rising from 0 and will continue to rise until A5 is pressed again. As soon as the A5 button is pressed, the variable ‘reaction’ is created. Its value is the time passed since the timer was set to millis().
The tone plays and the value of the ‘reaction’ variable is printed to the serial monitor along with the words between the quotes. After a quarter second the tone stops and timeToGo is reset to false, waiting again for the A5 button to be pressed again.


