Dice Roll
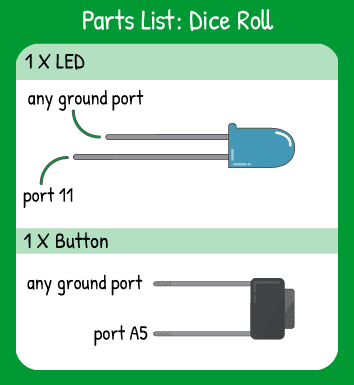
Step 1 - Build the Project
Topics Covered:
To create a rolling die with a button and a single LED, you need to trigger a random event with your input and then show the outcome with your output. The die can have 6 possible positions, so using blinks on the one LED can show the outcome of the ‘roll’.
Step 2 - Upload the Code
Step 3 - Read the Walkthrough
Within the setup() of the code, you need to have the button as an INPUT_PULLUP and the LED as an OUTPUT(). The real decision making within the code comes from the built in random() function in Arduino.
The loop doesn’t execute any code until the digitalRead of A5 is LOW, meaning the button is pressed. Immediately after that, the ‘for’ loop begins, which basically says “We’re creating a variable called ‘i’ that is equal to 0. Until ‘i’ is equal to 30, increase it by 1 for every loop of the ‘for’ loop.”. The contents of the ‘for’ loop are the flashing of the LED output on and off for 30 loops.
Once the flashes have completed, the next ‘for’ loop has to decide a random number for the outcome of the dice roll. The random() function will pick a number between 1 and 7, so 7 is not included in the possibilities.
The ‘for’ loop will blink through the ‘dice’ number, then the ‘for’ loop will exit and the loop will start over, waiting for another button press.


