LED Strip Changing Color Pixel Bounce
Step 1 - Build the Project
Send a single pixel up and down the strip, changing direction at each end and changing color along the way!
Step 2 - Upload the Code
Step 3 - Read the Walkthrough
The LED Strip library is a separate file of code. It contains functions and methods that are specific to controlling a strip of LEDs. To use the library, you use the #include statement. Then, you have to give the library some information, similar to setting pinMode() for components.
First, create an integer called numPixels. Its value should be equal to the number of LEDs on your strip.
Next, you’ll set up three variables that will have updating values throughout the loop.
Color refers to a value -1 to 300.
Pixel is the ‘index’ of the pixel the code is modifying. Keep in mind the first pixel is pixel 0.
Direction refers to whether the code is modifying a higher pixel address next or a lower pixel address next. If Direction is 1, then the code is moving up the strip toward the tip. If Direction is -1, the code is moving toward the base of the strip.
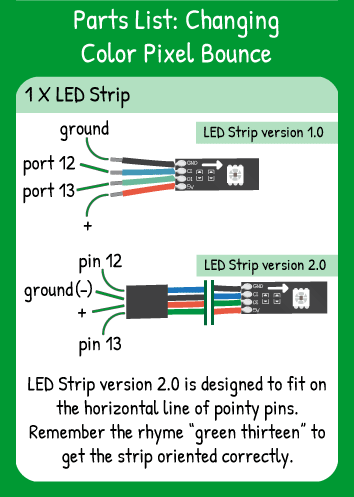
To tell the library the name & attributes of your LED Strip, you create an object. In this case, the object is called ‘strip’ and it has ‘numPixel’ pixels, the data pin is number 13, and the clock pin is number 12 on your carrier board.
Keep in mind that when the program runs, it runs from top to bottom. If you try to use a variable in the object-creation line, that variable has to be declared above the object creation line.
The setup() section has your button’s setup. It should be an INPUT_PULLUP pin mode so that it’s listening for signal, not generating signal.
In the loop, erase pixel by writing color value -1 to it. Next, update the value of pixel by “Direction”. The pixel will either be moving up or down the strip, depending on if Direction is positive or negative. Now use setPixel to set the color of your latest pixel address and your latest color value. strip.draw() displays the result on the strip.
Then, check if the pixel value is at either end of the LED strip. If it is, reverse the direction by multiplying that variable by -1.
Now update the color. This looks tricky, but it’s actually a useful tool called modulo. You know that the value of color can only reach 300. Imagine color is equal to 250. 250+77 = 327. 327/300 is 1 with a remainder of 27. So in this case, the color value now updates to 27. Next time through the loop, color will update to 104. 104/300 is 0 with a remainder of 104, so that color is not modified by the modulo.
The final delay controls the speed at which the color and pixel update.


