Random LED Pixel Colors
Step 1 - Build the Project
Use the random() function and the .setPixel method to create a dazzling random light show using every pixel on the LED Strip! A good introduction to combining variables with methods.
Step 2 - Upload the Code
Step 3 - Read the Walkthrough
First include the LEDStrip library. This library gives you access to a new set of commands (called methods) that make using the LED Strip easier. Without including the library, the software won't recognize the new commands you're giving it, like .setPixel() and .draw(). These commands are called methods and they're defined in the LEDStrip library.
Next, create an integer variable called numPixels. Its value should be equal to the number of LEDs on your strip.
The integer variable named color will hold the color value of a random pixel.
Your pixel variable holds the number of the active pixel that the code is modifying. In this program, that variable is randomly changing every time the loop runs.
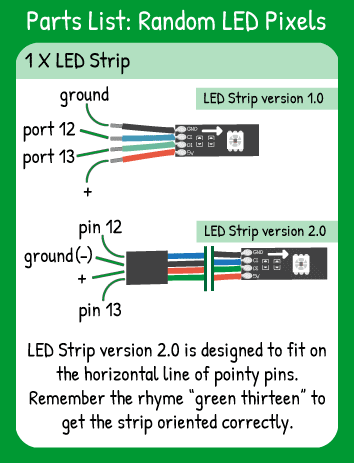
To tell the library the name & attributes of your LED Strip, you create an object. In this case, the object is called ‘strip’ and it has ‘numPixel’ pixels, the data pin is number 13, and the clock pin is number 12 on your Carrier Board.
The first thing the loop of your code does is change the value of the variable pixel. The random() function chooses a number that includes the first number you give it (0 in the example) and it excludes the second number. In this example, the second number is numPixels, which is set to 15 around line 10 of your code. The pixel variable will be 0, 1, 2, 3, 4, 5, 6, 7, 8, 9, 10, 11, 12, 13, or 14. With the LED strip, the pixel closest to the colored wires of the strip is called pixel 0. The last pixel at the tip of the strip is pixel 14.
Next, the value of the color pixel is set to a random value. To make sure the color changes are very clear, the random function only selects a value between 0 and 5. Then, that value is multiplied by 50, so color can equal 0, 50, 100, 150, 200, or 250. You can change this 'multiplier' and see what happens to your project.
Now you have two random variables, color and pixel and you can use them as arguments inside the strip.setPixel method.
The strip.draw() method doesn't need any arguments, it's just a command to display whatever is in strip.setPixel. This method is what makes the strip actually light up.
Finally, your delay determines how fast the pixels and color change on the LED strip. You can create a calm and relaxing project or a high-speed, high-energy one!


