LED Strip Timing Game
Step 1 - Build the Project
Try to hit the button just as the moving pixel passes the center pixel. Level up and increase your speed. How fast can you go?
Step 2 - Upload the Code
Step 3 - Read the Walkthrough
First include the LEDStrip library. This library gives you access to a new set of commands (called methods) that make using the LED Strip easier. Without including the library, the Arduino software won’t recognize the new methods.
Next, create an integer variable called numPixels. Its value should be equal to the number of LEDs on your strip.
The middlePixel variable is an integer based on your numPixels variable. Integers truncate (cut off) all decimal places, so if you have 15 pixels, 15/2 will be an integer value of 7.
Your pixel variable holds the number of the active pixel that the code is modifying.
The hitColor variable is a color value between 0 and 300. It will show up when you score a point on the game
The missColor variable is a color value between 0 and 300. It will shop up when you miss a goal. It’s also used as the color of your player throughout the game.
The Direction variable tells whether the pixel is moving toward the tip of the strip or toward the base. -1 means the pixel is moving toward the base of the strip.
Your delayTime variable holds the delay value between pixels being lit up. The lower the delay, the faster the ball moves.
The timer variable is a ‘long’ variable. Long variable types can hold very large numbers. This variable is set equal to millis() (an automatic counter). Since timer will hold the count of milliseconds later in the code, it should be a long variable type.
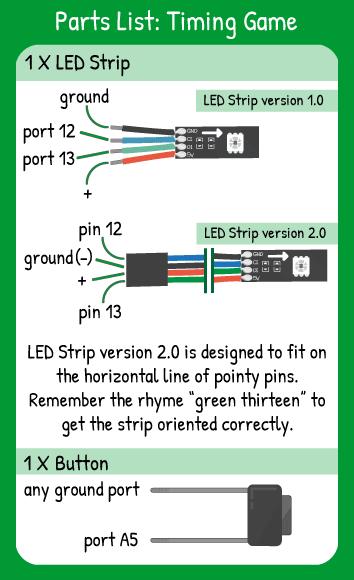
To tell the library the name & attributes of your LED Strip, you create an object. In this case, the object is called ‘strip’ and it has ‘numPixel’ pixels, the data pin is number 11, and the clock pin is number 12 on your carrier board.
In the setup, set a button pin as INPUT_PULLUP pin mode. This means it will send Maker Board a LOW signal when the button is being pressed.
The loop is checking the position of the pixel & the status of the button and reacting with colors and changes to the delay.
The first if statement in the loop checks to see if the value of pixel matches the value of middlePixel. If that is true, then that pixel color is changed to the sum of hitColor and missColor.
The next if statement is nested within the first. That means it is only checked if the first if statement is true. If the button is pressed while the pixel is in the middle of the strip, the delayTime is updated to 75% of what it previously was, meaning it will move faster. Next, the entire strip (strip.ALL) is lit up for 1 second as the hitColor.
Now both of the if statements close with curly braces.
The next if statement is true when pixel is not equal to middlePixel. When that is true, the pixel is set to missColor and the middlePixel is set to hitColor. The if statement that checks the button press is nested inside the if statement that checks the pixel’s position. If the button is pressed and the pixel is not in the middle, the entire strip(strip.ALL) is set to missColor and flashed for one second. Then 100 is added to the delayTime to slow the pixel down again.
The next if statement is all about timing. Millis() is an automatic timer: it starts counting up as soon as Maker Board starts running the code. When Maker Board has run for 1 second, millis() is 1000. When it has run for a minute, millis() is 60000. This if statement asks “if I subtract the timer variable from millis(), is it greater than the delayTime variable?”. If that is true, the timer variable is reset to the current value of mills(). That means that millis()-timer would now equal 0.
After the timer is reset, the current pixel is set to clear (color value -1) and the pixel variable is updated by “Direction”. If Direction is 1, the pixel moves up the strip. If Direction is -1, the pixel moves down the strip.
The final nested if statement checks to see if pixel has reached either the base or the tip of the strip. If it has, Direction is reversed.
Finally, the strip.draw() command sends all of the strip.setPixel commands to the strip so that you can see the update.


